The deadlift is one of the “big three” of effective basic exercises and should be just like the squats and the Bench press (bench press) is not missing in any training plan for building muscle! This fact makes it of fundamental importance that you have perfect mastery of the right technique and exercise execution for the deadlift!
It doesn’t matter whether you are male or female, are just beginning or at the end of your training career or just want to maximize your athletic performance in other disciplines and sports. Deadlifts should be part of your training . Accept that.
Why is the deadlift so important?
The deadlift is THE exercise par excellence when it comes to building a massive and powerful lower back. The stronger and more trained your lower back muscles, the easier it is for you to keep your lumbar spine rigid and in a stable position under stress. This is not only important during training, but also in everyday life. Anyone who has ever had to stack a couple of full crates of drinks will definitely appreciate the benefits of strengthened back and leg muscles!
Your lumbar muscle culture ensures that your entire lower spine is not moved out of its stable and anatomically optimal position, even under stress. The entire force is transmitted through your rigid and fixed torso. The more stable your torso, the more effectively a force can be transmitted. The deadlift mainly trains the following muscles:
- Abdominal muscles (lateral and oblique abdominal muscles)
- Intercostal muscles (muscles between the ribs)
- Ischiocrural muscles (legs, buttocks, lower back)
- biceps
- Trapezius
- Latissimus
- forearms
As you can see, almost every muscle that you somehow have in your body. This is also the main reason why the deadlift is so unpopular or even hated by many athletes. Deadlifts are incredibly exhausting. And effective. Or what do you think where this name comes from?
After an intense deadlift, e.g. is completed with a 5 × 5 training focused on maximum strength and muscle building, you can feel almost every muscle in your body, no matter how small.
You have unspeakable muscle soreness, which mainly affects your lower back and your hamstring muscles. But your abs and hamstrings will probably not escape sore muscles from deadlifting either.
But that is exactly what makes the deadlift so effective. The extensive stimulation of so many muscle groups will bring you massive training progress in all areas. You improve your maximum strength, speed strength and endurance as well as your general muscle coordination. You become stronger, faster and more powerful. That is your goal.
Deadlifting as a woman can produce impressive results. Even if the women mostly ignore the correct head position and prefer to watch themselves workout.
Learn the correct deadlift technique and exercises
Of course you’re not here because you want to hear some great fairy tales and stories about sore muscles after the deadlift. You want to experience it for yourself. You want progress. Successes. You want to learn the deadlift – with the right technique and the perfect exercise. And you do now.
Actually, deadlifting is pretty straightforward. You lift the barbell off the floor with your arms straight until your hips, knees, and shoulders are fully straight. This “simple” sequence of movements enables very heavy weights to be lifted.
Therein lies the great danger of deadlifting. Even with the wrong technique you can move very heavy weights, sometimes even more than with the right technique. But only until your spine gives up the ghost and even your orthopedic surgeon throws in the towel.
So that we can prevent this unnecessary situation, we simply learn the correct technique and exercise execution of the deadlift, which has also developed in several variants.
In addition to the classic deadlift, there are three other variants:
Sumo deadlift: In this variant, the grip is significantly tighter and between the legs, while the stance is significantly wider. Due to the shorter lever arm and the associated more vertical back angle, the load on the torso is significantly lower in the sumo variant.
Romanian Deadlift: The RDL primarily trains the hamstring muscles (rear thighs), because these are completed with a different “Range of Motivation” than the classic deadlift. In contrast to the “stiff legged deadlift”, the legs are “unlocked” in a position of approx. 15 ° so that the load on the rear thigh is greater. So you stand with your legs slightly bent.
Stiff legged deadlift: This variant is performed with fully stretched legs, so it has certain similarities to the RDL.
However, since we aim at maximum utilization of all muscle groups that can be involved in the deadlift, we focus on the technique of the classic deadlift. We will ignore the other variants at this point. If you are interested, you can google a round on Youtube. Mark Rippetoe is arguably one of the best instructors on this subject. Stick to him.
Special features of the deadlift
Although the execution of the deadlift seems quite simple, there is a lot of complexity behind this exercise! In particular, the straight back position when lifting and lowering the barbell is a great challenge for many athletes who have memorized a wrong execution or have no experience with the deadlift.
In addition, there are other factors that can limit an error-free execution of the deadlift. A major reason for poor or poor technique is severely pre-fatigued or injured hamstring muscles , which can make lifting the barbell cleanly above the knee point very difficult.
The grip should not be neglected when performing the deadlift. If this subsides, the body can no longer perform a clean deadlift for reflex reasons, no matter how much you want. If the weight is already too heavy to hold, you won’t be able to do a single clean rep with that weight.
The biggest difference between squats and deadlifts, however, is the contraction pattern an athlete goes through while performing the exercise. While doing the squat from the static starting position in the downward movement (eccentric contraction) to the lowest point and then immediately go explosively into the concentric upward movement and your “bounce” (the build-up of muscle tension through the increasing muscle stretching in the downward movement) for If you use a targeted hip drive, the deadlift looks very different.
Not only is there missing the muscle tension induced by a downward movement under load, which causes a kind of “spring effect” that reaches the maximum amplitude when the lowest point is reached and literally hits you like a rubber band Upward movement is catapulted (we can call this a so-called “bounce”), but also the contraction pattern is completely reversed.
You start immediately with the hardest part of the exercise: The concentric lifting of the dumbbell. Your full strength and concentration is required from the very first moment and must even be maintained over the point of transition from the concentric to the eccentric (yielding) downward movement so that you do not make any mistakes with the deadlift .
You can’t somehow “feel your way forward slowly and see what’s going on” with the deadlift. Either you unfold your maximum explosive power immediately or you simply leave the dumbbell uncompromisingly and drive home again. Then you are much better off.
Raise the shit: The deadlift exercise
Now it comes to the actual execution. As usual with us, we first look at the performance-influencing parameters and finally go into the exact execution of the exercise. Then you at least know what to look out for when moving up and down and your permanent body tension. So: let’s go!
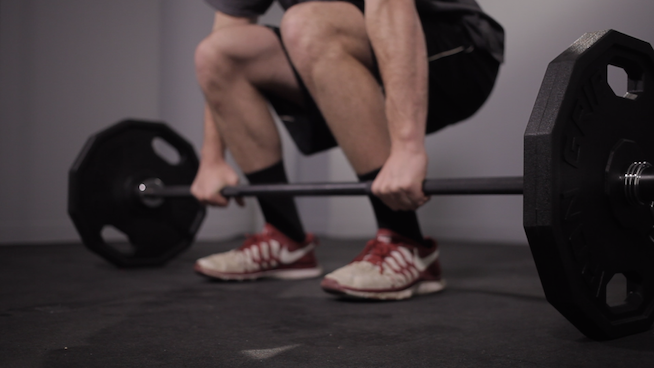
The correct stance for the deadlift
Before you even begin to grasp, lift, and then set any weights, you must first position yourself correctly in front of the dumbbell. To do this, take a stand where your verses are about 20-30cm apart. The taller an athlete is or the wider the pelvis, the wider the stance needs to be. As a rule, a stance about hip-width apart is ideal, while the toes point outwards around 15-30 ° .
Never move your shins further than 2-3cm away from the barbell. Only with this small distance can you position the dumbbell over your metatarsus and thus find the ideal balance between the body’s center of gravity and the dumbbell’s center of gravity, in which you can guide the barbell in a completely straight up and down movement in one line.
You actually have to get into the habit of guiding the dumbbell directly on your legs throughout the entire range of motion so that you do not leave the ideal straight line. Women in particular shy away from it because they don’t want to scratch their legs with the dumbbell. Long training clothing that bravely absorbs one or two scratches can help here.
Dumbbell position on the floor
The dumbbell should ideally be equipped with the discs that have the largest diameter. Unfortunately, these are often the very heavy metal discs, because many studios do not have light plastic discs. In this case, you should put the dumbbell on a rack or increase the position on the floor with mats or weight plates until the middle of the dumbbell is about 20cm away from the floor . For many athletes, this is the anatomically best distance for a correct grip and an optimal pelvic position at the start.
The right grip for the deadlift
Just your grip and the way you hold your hands decide whether your execution will succeed or whether it will end in a catastrophe. This is logical considering the fact that you cannot do a clean repetition if the barbell slips uncontrollably out of your fingers on the first set or if your hand opens when you start the concentric upward movement.
If this happens, there is really only one reasonable explanation: Your grip strength is not sufficient for the selected weight. The deadlift is probably the best exercise with which you can increase your grip strength – almost linearly to the progressive increase in your training weight.
In order for this to be even possible, at least your hand position must be right so that your grip strength can consistently increase. In addition, three types of grip have established themselves in the deadlift:
- Double overhand grip
- Double upper grip with straps / pulling aids
- Cross handle or inverted handle
All grip variants are used in such a way that the hands are outside the thighs with sufficient distance so that they do not get “caught” on the thighs when moving the dumbbell . Basically, a hand distance of 40-50cm is a good choice for all athletes. You can always orientate yourself on the two smooth surfaces in the middle of a standardized (Olympic) barbell. Ideally, the index fingers are 1-3 thumb widths away from the smooth surface (left and right).
With the double overhand grip , both hands are placed on the dumbbell in the same position at the level of the metatarsophalangeal joints, the fingers encircle the barbell. The overhand grip enables synchronous shoulder loading and develops the greatest grip strength, because the fingers have to hold the entire dumbbell load in your hand by “squeezing”.
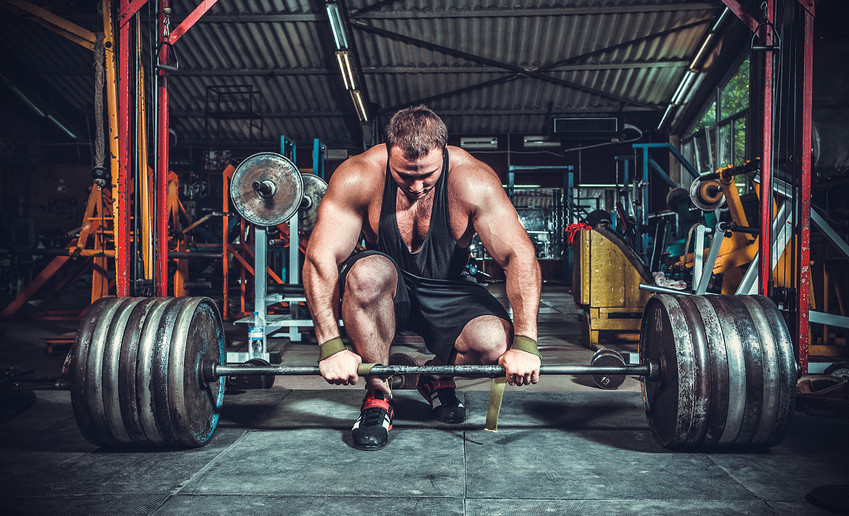
A tough example of an overhand deadlift with pulling aids. With this galactic weight, the dumbbell would otherwise slip mercilessly out of your fingers. (© Andriy Petrenko)
That is also the reason why many athletes use the double overhand grip only in combination with pulling aids use when deadlifting. Correctly used straps relieve the fingers and distribute the load more on the upper wrists, which allows you to lift significantly heavier weights. At the expense of your grip strength development.
If pulling aids are too annoying for you, but you also don’t have enough grip strength for an overhand grip at very high weights, the inverts your grip . One hand is turned towards the dumbbell with the ball of the hand and gripped from below. This so-called “cross grip” means that the weight of the dumbbell is “wedged” between your hands and can no longer slip out so easily.
The inverted handle allows you to lift enormous weights that would have fallen out of your fingers in the direction of the earth’s crust with the overhand grip. The big disadvantage of the cross grip, however, is the uneven load on the shoulders and biceps. Some athletes have experienced severe irritation or injury to the biceps tendon from the inverted grip.
Ideally, you just use the double overhand grip in all warm-up and light work sets. Only when the weight becomes too heavy to be able to cope adequately with the overhand grip do you use straps (pulling aids) or the inverted grip. In this way you ensure that your grip strength can still develop well.
1. Bend your knees and grab the barbell
After you have taken your stance and decided on a grip variant, you bend your straight back forward and push your knees forward until your shins touch the dumbbell. Important: Do not change the position of the dumbbell! Otherwise you have to correct your status again!
The hip automatically lowers through the coupled movement of knees and shins. Again, make sure that your thighs are in line with the tip of your foot. If necessary, push your knees out a little. In this position, your elbows can touch your knees slightly, that’s okay.
2. Tense your back and torso, straighten your torso
Now you are in the final starting position for the pull! You contract your upper back muscles, which lift your chest and stabilize your torso. In addition, you push your sternum between your arms up towards your chin. This movement triggers an additional extension of your spine, which is essential for a correct exercise. You don’t have to pull your shoulder blades back. This position cannot be held under load of the dumbbell anyway.
All of the tension has to carry through to your lumbar spine. If the tension is not high enough there, you regulate the muscle tension by tightening your lower back muscles and the hamstring muscles until you have reached the maximum and have the feeling of being in a “light hollow back”. That’s a good thing.
Maintaining spinal extension is not that easy when you have to contract your hamstrings and lower back massively. Just keep your pelvis up, think about the correct tension in your upper back and chest and take a deep breath!
3. The pull
Our Valsalva maneuver comes at this point too is used, which has also proven itself in squats. Inhaling deeply fills your lungs with air and puts pressure on the column of fluid in your stomach. By additionally tensing your abdominal muscles and back muscles, this pressure increases and stabilizes your entire torso and spine. You can find out more about this in our article on the Valsalva Method.
You have built up the pressure and you are starting to slowly pull the dumbbell up your shins. Shin contact is completely normal. The main thing is that the dumbbell is permanently in a straight line over your metatarsus !
Make sure you avoid the distance between your legs and the barbell. Any distance leads to the dumbbell leaving its ideal line and thus the equilibrium position and causes additional work that can unnecessarily strain your spine.
The back angle remains the same until the dumbbell passes your knees. Only then does the angle between the upper body and the floor change and become larger until it finally reaches 90 ° and you stand upright.
In this position you pull your shoulder back and push your sternum up, which again lifts your chest. An extreme, excessive stretching of the hips forward is completely unnecessary and only stresses your spine. Do without it
4. The downward movement
Is the exact mirror image of the upward movement. You begin by slowly lowering the dumbbell in exactly the same vertical line. The lumbar spine remains straight and tense while the hips slowly bend. Only when you have reached your knees do they also begin lowering until you have finally reached the end position again.
If your knees are in the way of the barbell, you’ve either lost back tension or decreased the angle in your upper body too late. Just train the right execution regularly with light weights until the technique fits perfectly!
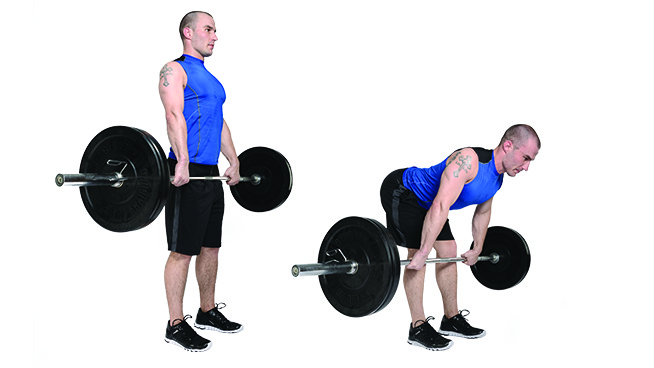
Our illustration above shows you the entire movement cycle during the deadlift.
The correct back posture for the deadlift
Anything you can do right in the deadlift, you can do wrong. You know that far, right?
It is therefore important that you develop an adequate understanding of correct back posture . This is the only way you can complete health-oriented training and not have to waste your time constantly regenerating damaged vertebrae.
A normal anatomical S-shaped curve of your spine is also the ideal starting position for the deadlift. For many untrained athletes or for all people who do not do physical work and work a lot at their desks, this natural curvature is easily lost. The main purpose of the introductory deadlift training is to restore the correct spine curvature , which must be maintained throughout the entire exercise.
Excessive lordosis, i.e. an over-curvature (S-curve) in the spine that is visible from the outside, is at least as damaging to the vertebrae and intervertebral discs – if not worse – than a rounded back. For anatomical reasons, women in particular are prone to extreme lordosis of the lower spine
The more muscle mass an athlete has on their back, the straighter the correct back position appears. This is the reason why the myth of an overstretched spine in the deadlift arose. Outwardly, skinny athletes or thin women show signs of the natural S-shape, which one hardly sees in a muscular athlete.
The following illustrations show you a correct back position and the positions that you should definitely avoid: 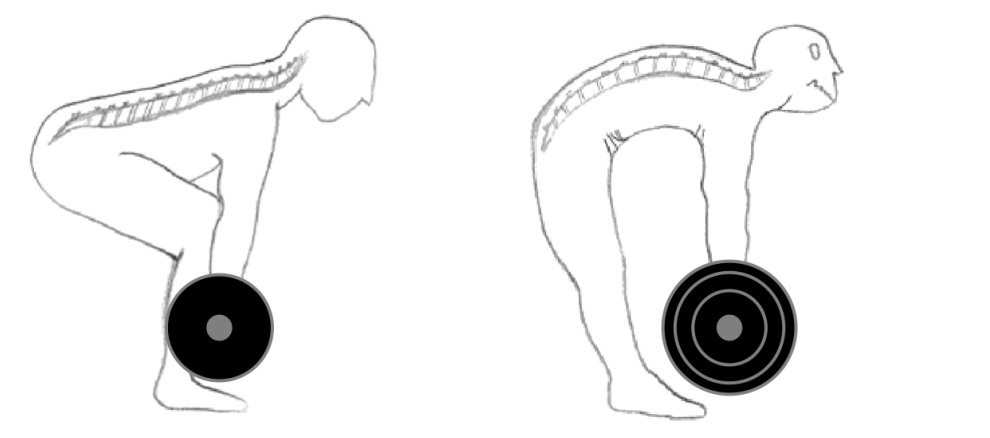
Pictures say more than a thousand words. Videos say more than 20,000 words when you consider that a flowing sequence of images (video) is perceived from as little as 18-20 images per second.
Back to the topic. You should watch the following videos a few times on a relaxed Friday evening so that you can start your training session well prepared the next day and have a clean deadlift. Have fun!